In the last post, I showed you how to upload Image to Firebase and show the uploaded Image in ImageView. Today, I will show you how to add Phone Number Authentication in the Android app using Firebase. We have used FirebaseUI library for achieving authentication.
Prerequisites
Make sure that your app is connected to Firebase.
FirebaseUI
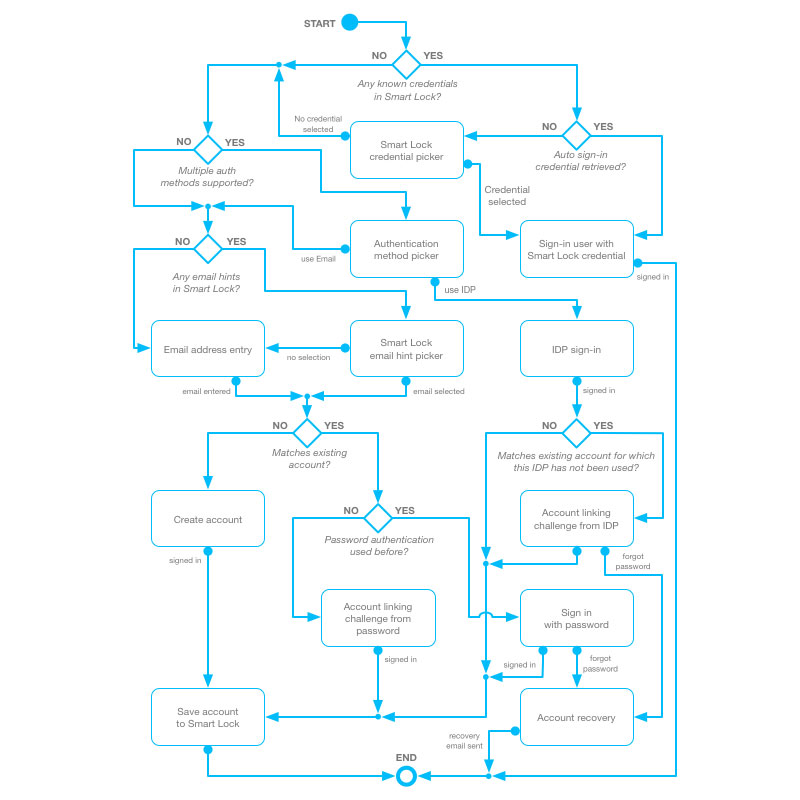
As mentioned earlier, we will be using FirebaseUI Android library for this. The main advantage of using FirebaseUI is that it is secure and hence you don’t have to write complex code of encrypting the user credentials. And it also handles all the cases, right from maintaining user sessions to password recovery.
The below flowchart shows all the cases handled by FirebaseUI.
Getting Started
Add the following dependency to your app level build.gradle file to use FirebaseUI.
compile 'com.firebaseui:firebase-ui:2.0.1'Make sure to add the Fabric repository to your project level build.gradle file. To do so, add the highlighted line.
allprojects {
    repositories {
        // ...
        maven { url 'https://maven.fabric.io/public' }
    }
}
Phone Number Authentication
Go to Firebase Console, select your project and click on the Authentication tab. Click on the Sign-in method, select Phone and enable it. Once you enable the option, a prompt will be shown asking for further configurations. You can ignore the message and click on save.

Now we need to add SHA Certificate Fingerprint for Google Login to work. For generating SHA, go to Android Studio, click on Gradle -> :app -> android and then double click on signingReport.

On opening the Gradle console, you can see the SHA.
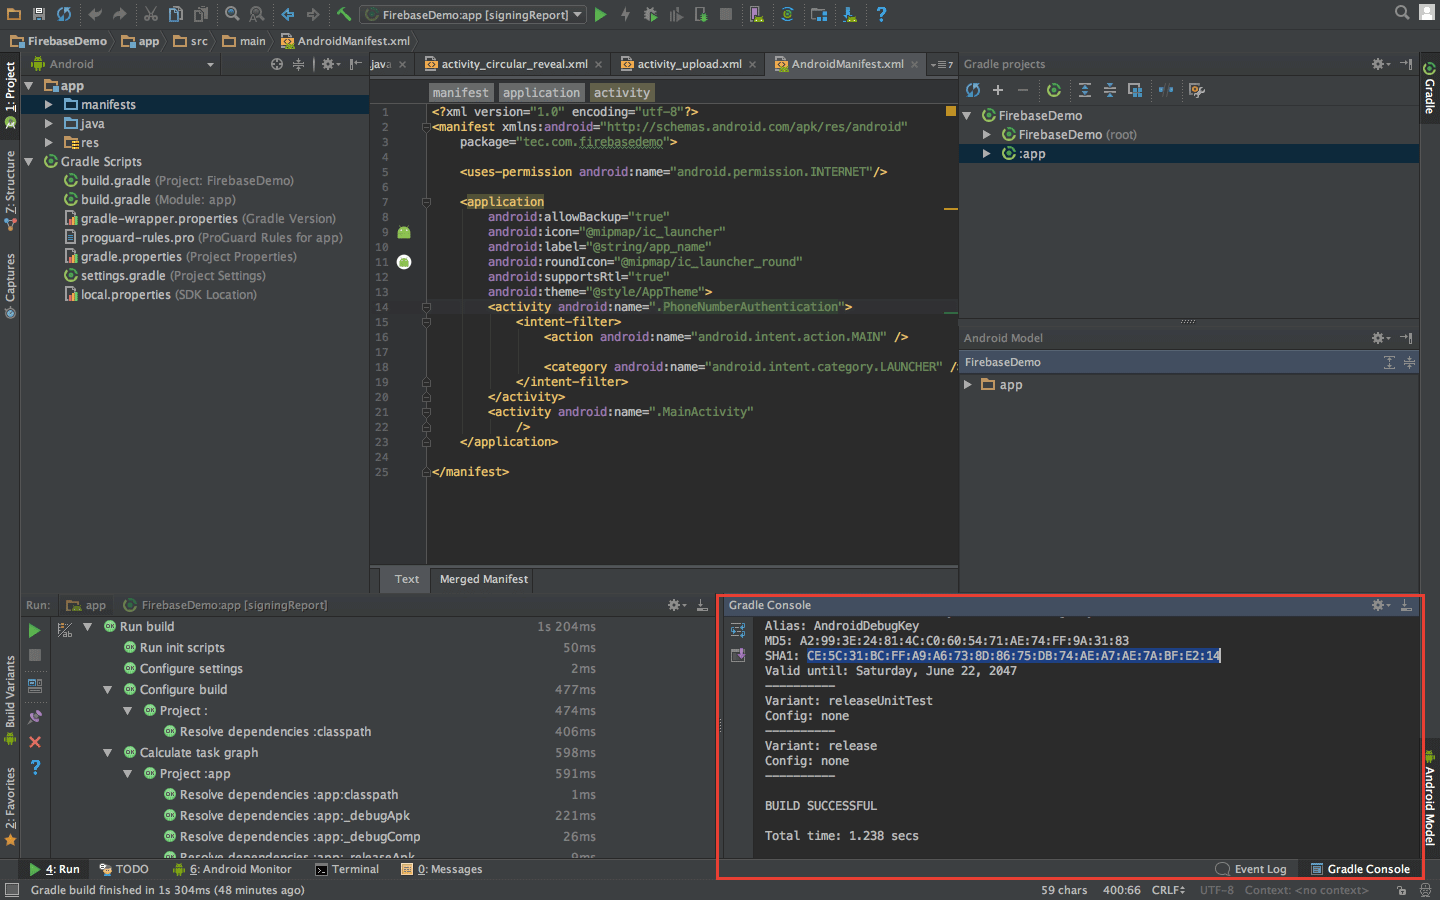
Now open Firebase, click on the Settings icon, scroll down and click on Add Fingerprint and copy the generated SHA.

Create an activity named PhoneNumberAuthentication and add the below code. Also, don’t forget to add this activity to your manifest file.
PhoneNumberAuthentication.java
import android.content.Intent;
import android.os.Bundle;
import android.support.annotation.Nullable;
import android.support.v7.app.AppCompatActivity;
import android.util.Log;
import com.firebase.ui.auth.AuthUI;
import com.firebase.ui.auth.ErrorCodes;
import com.firebase.ui.auth.IdpResponse;
import com.firebase.ui.auth.ResultCodes;
import com.google.firebase.auth.FirebaseAuth;
import java.util.Arrays;


public class PhoneNumberAuthentication extends AppCompatActivity {

    private static final int RC_SIGN_IN = 123;

    @Override
    protected void onCreate(@Nullable Bundle savedInstanceState) {
        super.onCreate(savedInstanceState);

        FirebaseAuth auth = FirebaseAuth.getInstance();
        if (auth.getCurrentUser() != null) {

            // already signed in
            startActivity(new Intent(PhoneNumberAuthentication.this, MainActivity.class));
            finish();

        } else {

            // not signed in
            startActivityForResult(
                    AuthUI.getInstance()
                            .createSignInIntentBuilder()
                            .setAvailableProviders(
                                    Arrays.asList(
                                            new AuthUI.IdpConfig.Builder(AuthUI.PHONE_VERIFICATION_PROVIDER).build()
                                            ))
                            .build(),
                    RC_SIGN_IN);

        }
    }

    protected void onActivityResult(int requestCode, int resultCode, Intent data) {
        super.onActivityResult(requestCode, resultCode, data);
        // RC_SIGN_IN is the request code you passed into startActivityForResult(...) when starting the sign in flow.
        if (requestCode == RC_SIGN_IN) {
            IdpResponse response = IdpResponse.fromResultIntent(data);

            // Successfully signed in
            if (resultCode == ResultCodes.OK) {
                startActivity(new Intent(PhoneNumberAuthentication.this,MainActivity.class));
                finish();
                return;
            } else {
                // Sign in failed
                if (response == null) {
                    // User pressed back button
                    Log.e("Login","Login canceled by User");
                    return;
                }

                if (response.getErrorCode() == ErrorCodes.NO_NETWORK) {
                    Log.e("Login","No Internet Connection");
                    return;
                }

                if (response.getErrorCode() == ErrorCodes.UNKNOWN_ERROR) {
                    Log.e("Login","Unknown Error");
                    return;
                }
            }

            Log.e("Login","Unknown sign in response");
        }
    }
}
Now when you run the app, you can see the Phone Number Authentication in action. If you face any problems, write it in the comment section and I will help you with that.
UI Customization
In order to customize the UI, make sure you have defined your app name in strings.xml file by a resource named app_name as shown below.
<resources>
    <string name="app_name">My Awesome App</string>
</resources>
Now create your own custom style in the styles.xml file and edit the UI as per your need. The custom style you create should have FirebaseUI as the parent and the three standard AppCompat colors must be defined. For the demo, I am creating a style having the purple theme as shown below.
<style name="PurpleTheme" parent="FirebaseUI">

    <!-- Required standard AppCompat colors -->

    <item name="colorPrimary">@color/material_purple_500</item>
    <item name="colorPrimaryDark">@color/material_purple_700</item>
    <item name="colorAccent">@color/material_yellow_a700</item>

    <item name="colorControlNormal">@color/material_purple_500</item>
    <item name="colorControlActivated">@color/material_majenta_a700</item>
    <item name="colorControlHighlight">@color/material_purple_a200</item>
    <item name="android:windowBackground">@color/material_purple_50</item>

</style>
Once the custom style is created, set it in the sign-in intent as shown below.
startActivityForResult(
AuthUI.getInstance(this).createSignInIntentBuilder()
       .setTheme(R.style.PurpleTheme)
       .build());
That’s it.

