In the last tutorial, I showed you how to connect an Android App to Firebase. Today I am going to show you how to add Email and Google authentication in Android using FireBase. Or in simple words, we will be adding Email and Google Login in an Android App using Firebase.
FirebaseUI
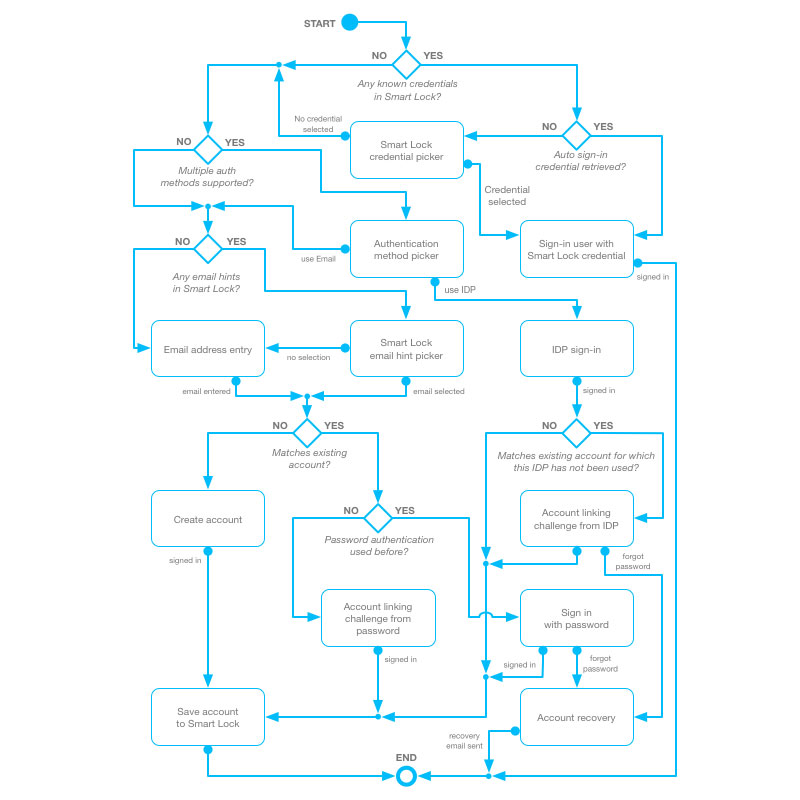
We will be using FirebaseUI Android library for this. The main advantage of using FirebaseUI is that it is developed by the Firebase team, is open source, secure and hence you don’t have to write complex code of encrypting the user credentials. And it also handles all the cases, right from maintaining user sessions to password recovery.
The below flowchart shows all the cases handled by FirebaseUI.
Getting started
FirebaseUI has four modules as shown below:
- FirebaseUI Auth
- FirebaseUI Firestore
- FirebaseUI Database
- FirebaseUI Storage
We will be using FirebaseUI Auth module for integrating Email and Google authentication in our Android app.
Note: In order to add Email and Google authentication into the app, the app must be connected to the Firebase. If you haven’t connected the app to Firebase, you can do so by following this tutorial.
Add the following dependency to your app-level build.gradle file to use FirebaseUI Auth.
implementation 'com.firebaseui:firebase-ui-auth:6.2.1'Email Authentication
Go to Firebase Console, select your project and click on Authentication tab. Click on Sign-in method, select Email/Password and enable it.

Now add the following permission to your manifest file.
<uses-permission android:name="android.permission.INTERNET"/>Now create a class named LoginActivity and add the code shown below.
Code in Kotlin
package tec.com.firebase.demo.kotlin

import android.app.Activity
import android.content.Intent
import android.os.Bundle
import android.util.Log
import androidx.appcompat.app.AppCompatActivity
import com.firebase.ui.auth.AuthUI
import com.firebase.ui.auth.AuthUI.IdpConfig.EmailBuilder
import com.firebase.ui.auth.AuthUI.IdpConfig.GoogleBuilder
import com.firebase.ui.auth.ErrorCodes
import com.firebase.ui.auth.IdpResponse
import com.google.firebase.auth.FirebaseAuth

class LoginActivity : AppCompatActivity() {

    // Request code for sign in
    private val RC_SIGN_IN = 123

    override fun onCreate(savedInstanceState: Bundle?) {
        super.onCreate(savedInstanceState)

        val auth = FirebaseAuth.getInstance()
        if (auth.currentUser != null) {
            // Already signed in
            startActivity(Intent(this@LoginActivity, MainActivity::class.java))
            finish()
        } else {
            // Not signed in. Start the login flow.
            startActivityForResult(
                AuthUI.getInstance()
                    .createSignInIntentBuilder()
                    .setAvailableProviders(
                        listOf(
                            EmailBuilder().build()
                        )
                    )
                    .setTheme(R.style.AppTheme)
                    .setIsSmartLockEnabled(false)
                    .build(),
                RC_SIGN_IN
            )
        }
    }

    override fun onActivityResult(requestCode: Int, resultCode: Int, data: Intent?) {
        super.onActivityResult(requestCode, resultCode, data)

        // RC_SIGN_IN is the request code you passed when starting the sign in flow.
        if (requestCode == RC_SIGN_IN) {
            val response = IdpResponse.fromResultIntent(data)
            if (resultCode == Activity.RESULT_OK) {
                // Successfully signed in
                startActivity(Intent(this@LoginActivity, MainActivity::class.java))
                finish()
                return
            } else {
                // Sign in failed
                if (response == null) {
                    // User pressed back button
                    Log.e("Login", "Login canceled by User")
                    return
                }
                if (response.error!!.errorCode == ErrorCodes.NO_NETWORK) {
                    Log.e("Login", "No Internet Connection")
                    return
                }
                if (response.error!!.errorCode == ErrorCodes.UNKNOWN_ERROR) {
                    Log.e("Login", "Unknown Error")
                    return
                }
            }
            Log.e("Login", "Unknown sign in response")
        }
    }
}
Code in Java
package tec.com.firebase.demo.java;

import android.content.Intent;
import android.os.Bundle;
import android.util.Log;

import androidx.annotation.Nullable;
import androidx.appcompat.app.AppCompatActivity;

import com.firebase.ui.auth.AuthUI;
import com.firebase.ui.auth.ErrorCodes;
import com.firebase.ui.auth.IdpResponse;
import com.google.firebase.auth.FirebaseAuth;

import java.util.Arrays;

public class LoginActivity extends AppCompatActivity {

    // Request code for sign in
    private static final int RC_SIGN_IN = 123;

    @Override
    protected void onCreate(@Nullable Bundle savedInstanceState) {
        super.onCreate(savedInstanceState);

        FirebaseAuth auth = FirebaseAuth.getInstance();
        if (auth.getCurrentUser() != null) {
            // Already signed in
            startActivity(new Intent(LoginActivity.this, MainActivity.class));
            finish();
        } else {
            // Not signed in. Start the login flow.
            startActivityForResult(
                    AuthUI.getInstance()
                            .createSignInIntentBuilder()
                            .setAvailableProviders(Arrays.asList(
                                    new AuthUI.IdpConfig.EmailBuilder().build()
                            ))
                            .setTheme(R.style.AppTheme)
                            .setIsSmartLockEnabled(false)
                            .build(),
                    RC_SIGN_IN);
        }
    }

    @Override
    protected void onActivityResult(int requestCode, int resultCode, @Nullable Intent data) {
        super.onActivityResult(requestCode, resultCode, data);

        // RC_SIGN_IN is the request code you passed when starting the sign in flow.
        if (requestCode == RC_SIGN_IN) {
            IdpResponse response = IdpResponse.fromResultIntent(data);

            if (resultCode == RESULT_OK) {
                // Successfully signed in
                startActivity(new Intent(LoginActivity.this, MainActivity.class));
                finish();
                return;
            } else {
                // Sign in failed
                if (response == null) {
                    // User pressed back button
                    Log.e("Login", "Login canceled by User");
                    return;
                }

                if (response.getError().getErrorCode() == ErrorCodes.NO_NETWORK) {
                    Log.e("Login", "No Internet Connection");
                    return;
                }

                if (response.getError().getErrorCode() == ErrorCodes.UNKNOWN_ERROR) {
                    Log.e("Login", "Unknown Error");
                    return;
                }
            }
            Log.e("Login", "Unknown sign in response");
        }
    }
}
The above code checks whether a user is already logged in or not. If a user is already logged in, he/she is redirected to the MainActivity, otherwise, the user is asked to Signup via Email as shown below. Make sure to make the LoginActivity as a launcher activity.

Now when you run the app and signup using Email, you can see the authenticated User in Firebase console.

Google Authentication
Again go to Firebase Console, select your project and click on the Authentication tab. Click on the Sign-in method, select Google and enable it.
Now we need to add SHA1 Certificate Fingerprint for Google Login to work. For generating SHA go to Android Studio, click on Gradle -> Your app name -> app -> Tasks -> android and then double click on signingReport.

You can find the SHA1 in the Run tab of Android Studio as shown below.

Now open Firebase, click on Settings icon and select Project settings. Scroll down, click on Add fingerprint and copy the generated SHA1.

Now open your Login activity and modify the startActivityForResult code as shown below.
Code in Kotlin
startActivityForResult(
                AuthUI.getInstance()
                    .createSignInIntentBuilder()
                    .setAvailableProviders(
                        listOf(
                            EmailBuilder().build(),
                            GoogleBuilder().build()
                        )
                    )
                    .setTheme(R.style.AppTheme)
                    .setIsSmartLockEnabled(false)
                    .build(),
                RC_SIGN_IN
            )
Code in Java
startActivityForResult(
                    AuthUI.getInstance()
                            .createSignInIntentBuilder()
                            .setAvailableProviders(Arrays.asList(
                                    new AuthUI.IdpConfig.EmailBuilder().build(),
                                    new AuthUI.IdpConfig.GoogleBuilder().build()
                            ))
                            .setTheme(R.style.AppTheme)
                            .setIsSmartLockEnabled(false)
                            .build(),
                    RC_SIGN_IN);
In the above code, we added Google Sign in Builder along with the Email one and also disabled smart lock as it logs in the user automatically without showing the login screen. Now run the app and log in with Google.

You can see that Firebase console shows that the user has logged in using Google account.

The source code of the Kotlin and Java sample apps for this entire Firebase series can be found on the links given below.
In the next tutorial, I will show you how to save and retrieve data from Android app to Firebase.

