In the last tutorial, I showed you how to add Email and Google Login using Firebase in an Android app. Today we are going to learn how to save and retrieve data from Firebase Realtime Database in Android.
The prerequisites
Before using Firebase Realtime Database, make sure that you have connected your Android app to Firebase.
Setting up the Realtime Database
Go to the Firebase Console, select your project and click on the Database tab. Scroll down and you will find a Realtime Database section.
Click on Create database, select the Start in test mode option and then click Enable.
Adding dependency
Add the following Firebase Database dependency to your app level build.gradle file.
implementation 'com.google.firebase:firebase-database:19.3.0'Saving Data to Firebase
Now let’s create an EditText in MainActivity that will take value from User and on clicking the submit button, the value will be saved to Firebase database.
activity_main.xml
<?xml version="1.0" encoding="utf-8"?>
<androidx.constraintlayout.widget.ConstraintLayout
    xmlns:android="http://schemas.android.com/apk/res/android"
    xmlns:app="http://schemas.android.com/apk/res-auto"
    xmlns:tools="http://schemas.android.com/tools"
    android:layout_width="match_parent"
    android:layout_height="match_parent"
    tools:context=".MainActivity">

    <androidx.appcompat.widget.AppCompatEditText
        android:id="@+id/etValue"
        android:layout_width="0dp"
        android:layout_height="wrap_content"
        android:layout_marginStart="16dp"
        android:layout_marginEnd="16dp"
        app:layout_constraintBottom_toTopOf="@+id/btnSubmit"
        app:layout_constraintEnd_toEndOf="parent"
        app:layout_constraintStart_toStartOf="parent"
        app:layout_constraintTop_toTopOf="parent"
        app:layout_constraintVertical_chainStyle="packed" />

    <androidx.appcompat.widget.AppCompatButton
        android:id="@+id/btnSubmit"
        android:layout_width="0dp"
        android:layout_height="wrap_content"
        android:layout_marginTop="24dp"
        android:text="SUBMIT"
        app:layout_constraintBottom_toBottomOf="parent"
        app:layout_constraintEnd_toEndOf="@+id/etValue"
        app:layout_constraintStart_toStartOf="@+id/etValue"
        app:layout_constraintTop_toBottomOf="@+id/etValue" />

</androidx.constraintlayout.widget.ConstraintLayout>
The above code creates a design as shown below.
Now let’s create a reference to the demo node in Firebase and add the value to this node when the user clicks on the Submit button. If a node is not present in the Firebase database, making a reference and setting the value automatically creates the node.
MainActivity (In Kotlin)
import android.os.Bundle
import androidx.appcompat.app.AppCompatActivity
import com.google.firebase.database.DatabaseReference
import com.google.firebase.database.FirebaseDatabase
import kotlinx.android.synthetic.main.activity_main.*

class MainActivity : AppCompatActivity() {

    override fun onCreate(savedInstanceState: Bundle?) {
        super.onCreate(savedInstanceState)
        setContentView(R.layout.activity_main)


        // Database reference pointing to root of database
        val rootRef: DatabaseReference = FirebaseDatabase.getInstance().reference

        // Database reference pointing to demo node
        val demoRef: DatabaseReference = rootRef.child("demo")

        btnSubmit.setOnClickListener {
            val value: String = etValue.text.toString()

            // Push creates a unique id in database
            demoRef.setValue(value)
        }
    }
}
MainActivity (In Java)
import androidx.appcompat.app.AppCompatActivity;

import android.os.Bundle;
import android.view.View;
import android.widget.Button;
import android.widget.EditText;

import com.google.firebase.database.DatabaseReference;
import com.google.firebase.database.FirebaseDatabase;

public class MainActivity extends AppCompatActivity {

    EditText editText;
    Button submit;
    DatabaseReference rootRef, demoRef;

    @Override
    protected void onCreate(Bundle savedInstanceState) {
        super.onCreate(savedInstanceState);
        setContentView(R.layout.activity_main);

        editText = findViewById(R.id.etValue);
        submit = findViewById(R.id.btnSubmit);

        // Database reference pointing to root of database
        rootRef = FirebaseDatabase.getInstance().getReference();

        // Database reference pointing to demo node
        demoRef = rootRef.child("demo");

        submit.setOnClickListener(new View.OnClickListener() {
            @Override
            public void onClick(View v) {
                String value = editText.getText().toString();

                // Push creates a unique id in database
                demoRef.setValue(value);
            }
        });
    }
}
Now when you run the app and type something in EditText and then click on the Submit button, you can see that value is saved to the Firebase database as shown below.
Retrieving data from Firebase
Not let’s add another button which will fetch the value from the database and display it in TextView. Add the below code inside ConstraintLayout in the activity_main.xml file.
 <androidx.appcompat.widget.AppCompatButton
        android:id="@+id/btnFetch"
        android:layout_width="0dp"
        android:layout_height="wrap_content"
        android:layout_marginTop="16dp"
        android:text="FETCH"
        app:layout_constraintBottom_toTopOf="@+id/tvValue"
        app:layout_constraintEnd_toEndOf="@+id/btnSubmit"
        app:layout_constraintStart_toStartOf="@+id/btnSubmit"
        app:layout_constraintTop_toBottomOf="@+id/btnSubmit" />

    <androidx.appcompat.widget.AppCompatTextView
        android:id="@+id/tvValue"
        android:layout_width="0dp"
        android:layout_height="wrap_content"
        android:layout_marginTop="24dp"
        android:textSize="18sp"
        android:textAlignment="center"
        app:layout_constraintBottom_toBottomOf="parent"
        app:layout_constraintEnd_toEndOf="@+id/btnFetch"
        app:layout_constraintStart_toStartOf="@+id/btnFetch"
        app:layout_constraintTop_toBottomOf="@+id/btnFetch" />
Now, in order to fetch the value from the demo node in Firebase, use the already created database reference pointing to the demo node and attach a ValueEventListener to it. To do so, add the following code in the onCreate of your MainActivity.
MainActivity (In Kotlin)
btnFetch.setOnClickListener {
            demoRef.addListenerForSingleValueEvent(object : ValueEventListener {

                override fun onDataChange(dataSnapshot: DataSnapshot) {
                    val value = dataSnapshot.getValue(String::class.java)
                    tvValue.text = value
                }

                override fun onCancelled(databaseError: DatabaseError) {
                    Toast.makeText(this@MainActivity, "Error fetching data", Toast.LENGTH_LONG)
                        .show()
                }
            })
        }
MainActivity (In Java)
Button fetchButton = findViewById(R.id.btnFetch);
        final TextView fetchedText = findViewById(R.id.tvValue);

        fetchButton.setOnClickListener(new View.OnClickListener() {
            @Override
            public void onClick(View v) {
                demoRef.addListenerForSingleValueEvent(new ValueEventListener() {
                    @Override
                    public void onDataChange(@NonNull DataSnapshot dataSnapshot) {
                        String value = dataSnapshot.getValue(String.class);
                        fetchedText.setText(value);
                    }

                    @Override
                    public void onCancelled(@NonNull DatabaseError databaseError) {
                        Toast.makeText(MainActivity.this, "Error fetching data", Toast.LENGTH_LONG).show();
                    }
                });
            }
        });
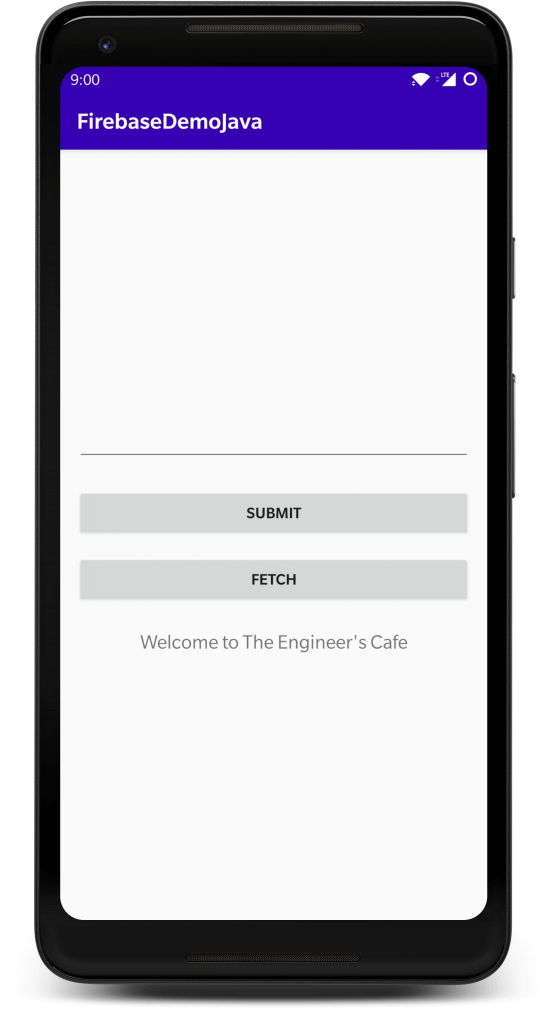
When you run the app and click on the fetch button, you can see that the message Welcome to The Engineer’s Cafe is fetched from Firebase and displayed in TextView as shown below.

In case you are facing any issues, you can find the full code on Github at the below links.
In the next tutorial, I will show you how to upload an image to Firebase Storage and show the uploaded image in ImageView.
Also, we recently launched the Bulk Image Compressor Android app that can quickly compress multiple images at once. The app is free to use. Do give it a try and let us know your feedback and suggestions.


